
Coliving.com connects property owners with a global audience seeking flexible, community-focused living spaces. Here’s what you need to know:
- Who Can List: Professional operators with properties offering at least six furnished rooms, shared spaces, and all-inclusive pricing (utilities, Wi-Fi, etc.).
- Costs: Listing is free. Fees apply only after a confirmed booking - 25% of the first month’s rent for short stays (up to 3 months) and 10% for longer stays.
- Approval Process: Only 20% of applications are accepted, ensuring high standards for safety, management, and community engagement.
- Key Requirements: Secure access, compliance with local laws, and individual leases for each room.
Why List? Coliving.com attracts over 90,000 monthly visitors and 115,000 active users, primarily young professionals and digital nomads. The platform handles resident verification, rent collection, and payment processing (within 48 hours of move-in).
To succeed, focus on creating a standout listing with high-quality photos, detailed descriptions, and clear, transparent pricing. Ensure your property meets all platform criteria and manage bookings efficiently to maximize visibility and occupancy.
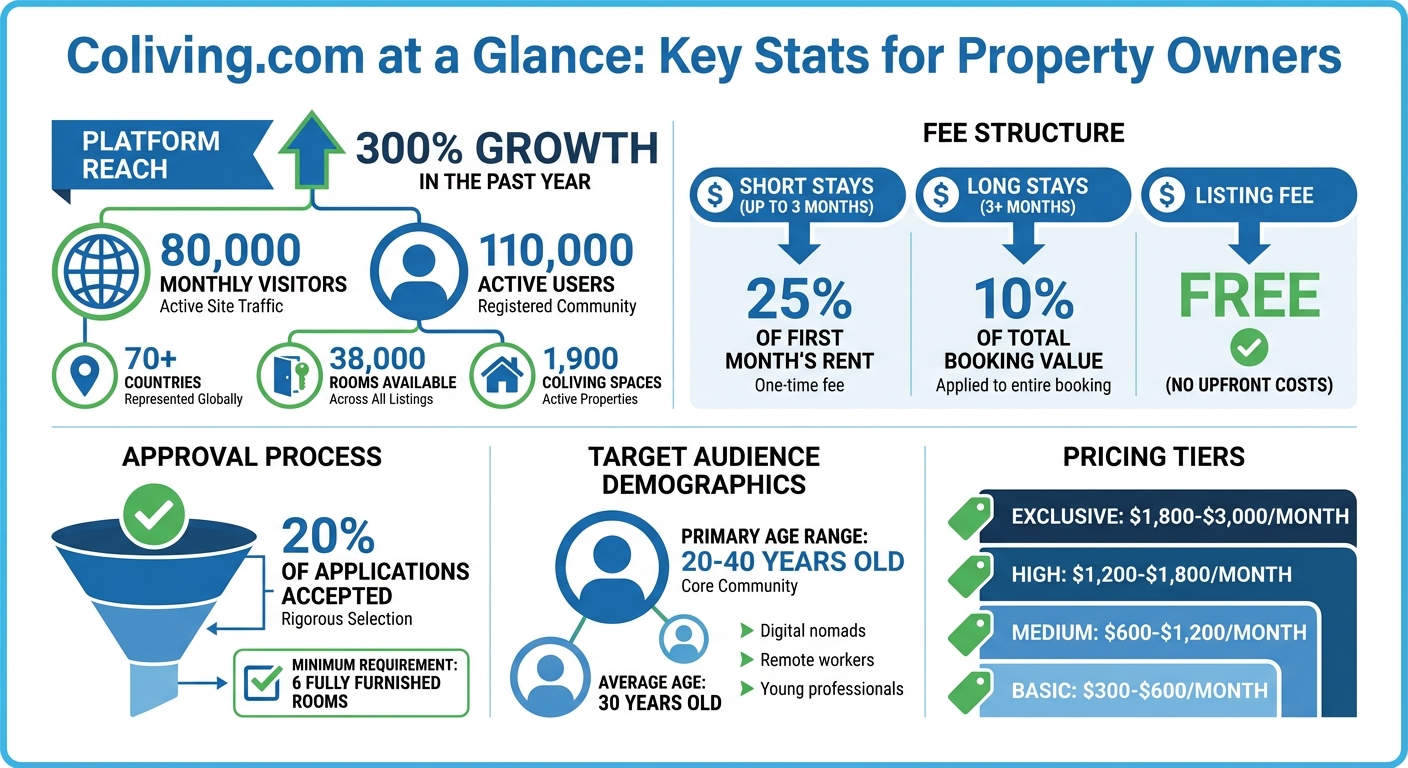
Coliving.com Platform Statistics and Fee Structure for Property Owners
Step 1: Check Property Requirements and Prepare Your Space
Before you start listing your property on Coliving.com, make sure it aligns with the platform's standards. Only properties managed by professional operators are eligible, and Coliving.com enforces strict approval guidelines to maintain quality across its marketplace.
Property Requirements
Your property must have a minimum of six fully furnished rooms, along with shared common areas, and offer all-inclusive pricing for utilities. This setup ensures there's enough room to foster the sense of community that defines coliving. The pricing should include essentials like electricity, water, gas, TV, and other utilities, with high-speed Wi-Fi being non-negotiable.
Flexible stay terms are another key requirement. While the minimum stay starts at one month, you can set longer terms based on your property’s needs. Safety is also a priority - secure access systems, emergency protocols, and regular maintenance are essential. Additionally, you’ll need to comply with local zoning laws, rental regulations, tax requirements, and secure any required permits or licenses. Be ready to verify the identity of every resident at move-in and complete background checks within six days of booking approval.
Once you’ve confirmed these requirements, it’s time to prepare your property to create an inviting and functional coliving space.
Setting Up Your Space for Coliving
Designing an effective coliving space involves striking the right balance between private and shared areas. Furnish your property with durable yet stylish furniture that works for both personal and communal spaces. Also, make sure your internet can handle heavy usage - commercial-grade Wi-Fi is a must for properties with multiple residents.
To ensure smooth operations, establish clear house rules. These should cover responsibilities for shared spaces, expected behavior, and move-in processes. Unlike traditional rentals, where one lease typically covers the entire unit, coliving spaces require individual leases for each bedroom. While this setup requires more detailed management, it allows for higher occupancy rates and appeals to the platform’s target audience - primarily professionals aged 20 to 40, with an average age of 30.
Step 2: Sign Up and Create Your Listing
Now that your property is ready and you've nailed down the details, it's time to set up your host account and create your listing. The process is simple, but having the right documents and information on hand will make things smoother.
Create Your Host Account
You can register using your email or phone number, but both must go through a verification process before your account becomes active. This two-step verification - confirming both your email and phone number - is a key part of the platform's security measures.
After verifying your contact info, you'll need to apply to be listed by describing your coliving business in at least 30 characters. Since the application is competitive, be clear and specific about your operation and what makes your property ideal for coliving. Have the following details ready before you begin:
- Your brand name
- Incorporation country
- Website URL
- Social media links (Facebook, Instagram, Twitter/X, LinkedIn)
Additionally, you'll need to provide proof of identity and documentation verifying your legal right to advertise the property. If you're aiming for Elite Host status - boosting trust and visibility - be prepared for extra steps like submitting property ownership documents and undergoing a background check.
Once your account is verified, you're ready to add your property details.
Enter Your Property Details
After approval, you'll enter key details about your property. Start with its location, type (e.g., villa, apartment), and the number of fully furnished rooms - there must be at least six. You'll also define your target audience, such as digital nomads, students, entrepreneurs, or young professionals, so potential tenants can quickly see if your space suits their needs.
The listing builder will confirm that all rooms are fully furnished and utilities (electricity, water, gas, high-speed Wi-Fi) are included. You'll also need to set your booking rules, including move-in instructions, minimum stay requirements (starting at one month), and your pricing. You can choose to list nightly or monthly rates. Keep in mind that listing is free, but Coliving.com applies a service fee - 25% of the first month's rent for stays up to three months, or 10% for longer stays.
With Coliving.com attracting 90,000 monthly visitors and over 115,000 active users, your listing needs to stand out. Use high-quality photos and concise, engaging descriptions to grab attention. Take advantage of the Calendar Sync feature (iCalendar format) to keep availability up-to-date and avoid double-bookings. Be transparent about all mandatory costs, including security deposits or local taxes.
Once you've entered all the details, the next step is optimizing your listing to maximize visibility.
Step 3: Make Your Listing Stand Out
With 50,000 rooms spread across 2,000 coliving spaces on the platform, competition is fierce. Once you're listed, the next step is making your property impossible to overlook.
### Essential Features for Your Listing
A great listing starts with stunning visuals. Photos are the first thing potential tenants notice, so make them count. Use high-resolution, well-lit, wide-angle shots to showcase both private rooms and shared spaces like coworking areas, kitchens, and lounges. If your property includes amenities like fitness centers, game rooms, or private phone booths, make sure they’re front and center in your photo gallery.
Your description should do more than skim the surface. Be specific. Mention details like room dimensions, soundproofing, USB charging ports, and independent climate controls. Since many tenants - especially Millennials and Gen Z aged 20 to 40 - are remote workers, highlight features like high-speed Wi-Fi, 24/7 workspace access, and clearly separated areas for work and socializing. These tenants value comfort and productivity and are willing to pay for it.
If your property incorporates eco-friendly features, like energy-efficient appliances, smart thermostats, or recycling programs, mention them to attract renters who prioritize sustainability. Additionally, include details about the neighborhood, such as proximity to public transit, major employers, universities, and popular dining or entertainment spots. Use searchable keywords like "pet-friendly," "near [specific university or employer]," or "updated kitchen" to boost your listing's visibility.
Set Clear Pricing
Coliving.com requires an all-inclusive pricing model, meaning your monthly rate should cover rent, utilities (electricity, water, gas), high-speed Wi-Fi, and cleaning services. Surprise fees are a no-go - be upfront about all costs in your listing. This transparency not only builds trust but also reduces unnecessary back-and-forth with potential tenants.
Pricing tiers typically fall into these ranges:
- Basic: $300–$600 per month
- Medium: $600–$1,200 per month
- High: $1,200–$1,800 per month
- Exclusive: $1,800–$3,000 per month
You can adjust your rates seasonally, charging more during high-demand periods like festivals or conferences and offering discounts for longer stays or returning tenants. Clearly state your security deposit and whether it’s refundable. If you provide optional services, such as breakfast or laundry packages, list them as add-ons that tenants can opt into before moving in. Always offer your best price upfront to establish trust.
Use Filters to Reach Your Target Residents
The platform’s filters help match your property with the right audience. Set a minimum stay of one month and specify room types to align with tenant expectations.
Clearly define your target demographic, whether it’s digital nomads, students, entrepreneurs, or young professionals. If you offer flexible month-to-month leases or longer stays (up to 12 months), make sure your listing reflects that. Keeping your availability updated is crucial - it avoids double bookings and ensures your listing remains credible and reliable.
Step 4: Publish Your Listing and Manage Bookings
Get Your Listing Approved and Published
To get your listing live on Coliving.com, it first needs to pass their approval process, which is quite selective - only about 20% of applications make the cut. After submitting your listing through the "Apply to be listed" form, the verification you completed earlier will activate your host account.
Your property must meet specific criteria: it should have at least 6 fully furnished rooms, offer all-inclusive pricing models (covering utilities and high-speed Wi-Fi), and adhere to strict safety standards. Once approved, you commit to keeping the listing active and available for bookings for at least three months from the publication date. Be aware that Coliving.com may remove listings that violate terms, receive poor reviews, or have too many booking declines.
Manage Your Property
Once your listing is live, you can manage it through the host portal. You’ll have two booking options: "Instant Booking" for automatic confirmations or "Request Booking" if you prefer to manually review applications. Whichever you choose, responding to inquiries within 48 hours is essential to avoid penalties.
When a booking request comes in, act quickly - review, confirm, and provide move-in instructions. If background checks are required, you’ll have up to six days to complete them. On move-in day, verify the resident’s identity and report any discrepancies within 24 hours to protect your payout guarantee. To stay organized, use Calendar Sync or manually block unavailable dates to avoid double-bookings. If you need to cancel a confirmed booking, reach out to Coliving.com support directly - cancellations can’t be processed via the dashboard, and penalty fees might apply.
Increase Your Bookings
Maximizing visibility is crucial to attracting more bookings. Coliving.com’s large user base and monthly traffic give your property excellent exposure. To expand your reach even further, enable listing distribution to share your property on partner sales channels. Opting for Instant Booking can also help by reducing friction and encouraging faster confirmations.
Quick responses are another way to stay competitive. The platform’s 48-hour response rule doesn’t just meet their standards - it also helps you stand out to potential residents. Discounts for stays longer than three months can improve occupancy rates, and the fee structure works in your favor: 25% of the first month’s rent for shorter stays and just 10% of the total booking value for stays over three months.
You can also add optional services, like laundry, to make your property more appealing. Keep your pricing competitive - Coliving.com’s price match guarantee means you’ll need to match lower rates found elsewhere for the same property and dates. Payments are typically processed 24 hours after a resident moves in, so you’ll have access to your earnings quickly.
Conclusion
List your property and connect with a global audience of over 110,000 residents across 70+ countries. By verifying your account, meeting platform requirements, creating a compelling listing, and efficiently managing bookings, you'll follow a system designed to attract community-minded residents and boost occupancy rates.
Coliving.com simplifies property management with features like automated tools, secure payment systems, and access to a focused audience of more than 90,000 monthly visitors. With no upfront fees and a transparent service fee model, you only pay when bookings are secured - keeping the process straightforward and cost-effective.
To stand out, stay responsive and ensure your listing is accurate. The platform's selective approval process prioritizes quality, meaning your property will be showcased alongside trusted coliving brands. Keeping your calendar up-to-date and your information precise will help you thrive in this carefully curated marketplace.
Whether you're converting a homestay or managing six rooms or more, Coliving.com equips you with the tools and audience to attract digital nomads, remote workers, and young professionals looking for flexible, all-inclusive living spaces. Apply now and join a platform that's seen 300% growth in just the past year.
FAQs
What are the advantages of listing my property on Coliving.com?
Listing your property on Coliving.com opens the door to some major advantages. First off, it provides free exposure to a platform that draws over 90,000 visitors every month and boasts a growing network of 115,000+ members across 70 countries. This means your property gets seen by a highly targeted audience - Millennials and Gen Z renters who are actively looking for shared living spaces.
The platform also makes the process easy and straightforward. With user-friendly tools and verified profiles, you can confidently list your property, knowing that both you and potential residents are in a secure environment. On top of that, Coliving.com takes care of rent collection and ensures you receive payouts within 48 hours of a resident moving in. That’s a lot of time and stress saved.
In short, listing your property here boosts its visibility, connects you with the right renters, and simplifies your operations. It’s a smart move for property owners and coliving operators looking to tap into a community-focused market.
What steps should I take to ensure my property gets approved on Coliving.com?
To get your property listed on Coliving.com, focus on creating a profile that’s verified, community-focused, and professionally presented. Make sure your contact details, like your phone number and email, are verified - this is a must for both property owners and potential residents.
Include clear and accurate details about your property, such as amenities, pricing, and features that highlight the community aspect of your space. Write a description that’s both informative and engaging, and don’t forget to upload high-quality photos that truly showcase what your property has to offer. Emphasize how your space supports Coliving.com's mission of encouraging shared living and a strong sense of community.
Lastly, go through the platform’s terms of service and hosting guidelines to ensure your property meets all the required standards. Following these steps will help you attract the right audience and boost your property's visibility.
How can I make my property listing stand out on Coliving.com?
To make your property listing shine on Coliving.com, focus on crafting a detailed and appealing profile that showcases what makes your space special. Highlight unique features, amenities, and the sense of community your property offers. Use high-quality photos to create a strong first impression, and write descriptions that are clear, inviting, and emphasize standout aspects like a friendly atmosphere or a prime location.
Strive to become an Elite Host by consistently providing outstanding guest experiences and upholding high standards. Elite Hosts enjoy perks like increased visibility, exclusive advantages, and often see a boost in bookings. Verifying your listing is another great step to build trust and credibility with potential residents.
Stay connected with the community by communicating clearly, setting realistic expectations, and designing shared spaces that feel welcoming. Positive reviews and repeat bookings will naturally enhance your listing’s visibility. By following these steps, you’ll attract the right residents and make the most of your property’s potential.
